Fear is powerful. It can hold you back from accomplishing projects or becoming who you want to be. Getting past the fear of making mistakes takes preparation and practice. The only way to practice is to try and accept mistakes that happen. Conquer your fears of DIY mistakes by following the three steps that I describe in this post. They’re applicable to avoiding fear of making mistakes in more than just DIY, too!
Everything takes practice from tying your shoes to making stock purchases. No one is perfect on the first try. That’s okay! The important thing is that you try. Start now, take the first step. Stop delaying. It’s how you improve. Learn from your mistakes and move away from the fear holding you back.
We mostly talk about retiring early on this blog but today I’m writing to you about conquering fear. When it comes to getting your hands dirty and doing it yourself, getting over the fear of DIY mistakes is also a way to really build your wealth!
For DIY, most people are afraid of doing something wrong. No one wants to damage their house but mistakes do happen. The nice thing is that most things can be easily redone or halted while you call in the professionals.
Fear of Making DIY Mistakes
One of the ways I get past my fear of making mistakes in a DIY project is to think about the worst mistake I could make and plan for it. I know that I will ultimately do something wrong that may need fixing. If I prepare for the worst-case scenario, I can evaluate the associated risks and create a plan B. If the project still seems like it’s worth giving it a shot on my own, I dive right in.
When I pulled apart our 90+ year old window sashes to replace the sash cord and reconnect the window weights, I knew at worst I’d break a windowpane. Fortunately, our old city has plenty of handy pros that can cut new glass quickly, and replacing it isn’t too difficult with the sash out. Sure, it might cost me a hundred bucks in this worst-case scenario but it’s pretty unlikely and I can afford it.
After the completion of my last two do-it-yourself projects, I feel I have learned to deal with the fear of making mistakes that comes with bigger DIY projects. I definitely had my doubts in my abilities which significantly delayed the start of these projects. But once I worked through my DIY process and did my research, my confidence was boosted and I was ready to begin.
DIY Preparation Process
Over the years, I have done a variety of DIY projects ranging from handmade gifts to home repairs. Through trial and error, I have increasingly become more confident in my abilities to learn new skills and continue to relieve my fears of making mistakes and the associated risks.
With each project, I try to approach the DIY process in the same way to build up my skill set and reduce my fear of making mistakes.
- Evaluate if the project should be a DIY project
- Determine the risk of making mistakes
- Consider the benefits to do it myself
1) Can Quality DIY be Done?
Pretty much anything can be DIY but some things we should leave to the experts for the best results. Small simple projects are pretty easy to DIY and a good way to get your feet wet without worrying too much if you make a mistake. For bigger projects, say on your house or car, there is a lot more to think about.
Ask yourself these questions
- Can I really do this on my own?
- Do I have the skills, the tools, the time?
- How much will it cost me versus hiring or buying?
- What if I screw up and I have bad outcomes?
These are all important questions to answer before you get started but it may be hard to answer if you don’t start with a basic understanding of the scope of the project.
Doing a little research helps get to the bottom of these questions. Thank goodness for Google and YouTube to make this step a whole lot easier than it used to be. A quick Google search of “How to …” will result in a long list of explanatory videos and written instructions. Although, for more complex projects, you may still want to pick up a guidebook from your local library.
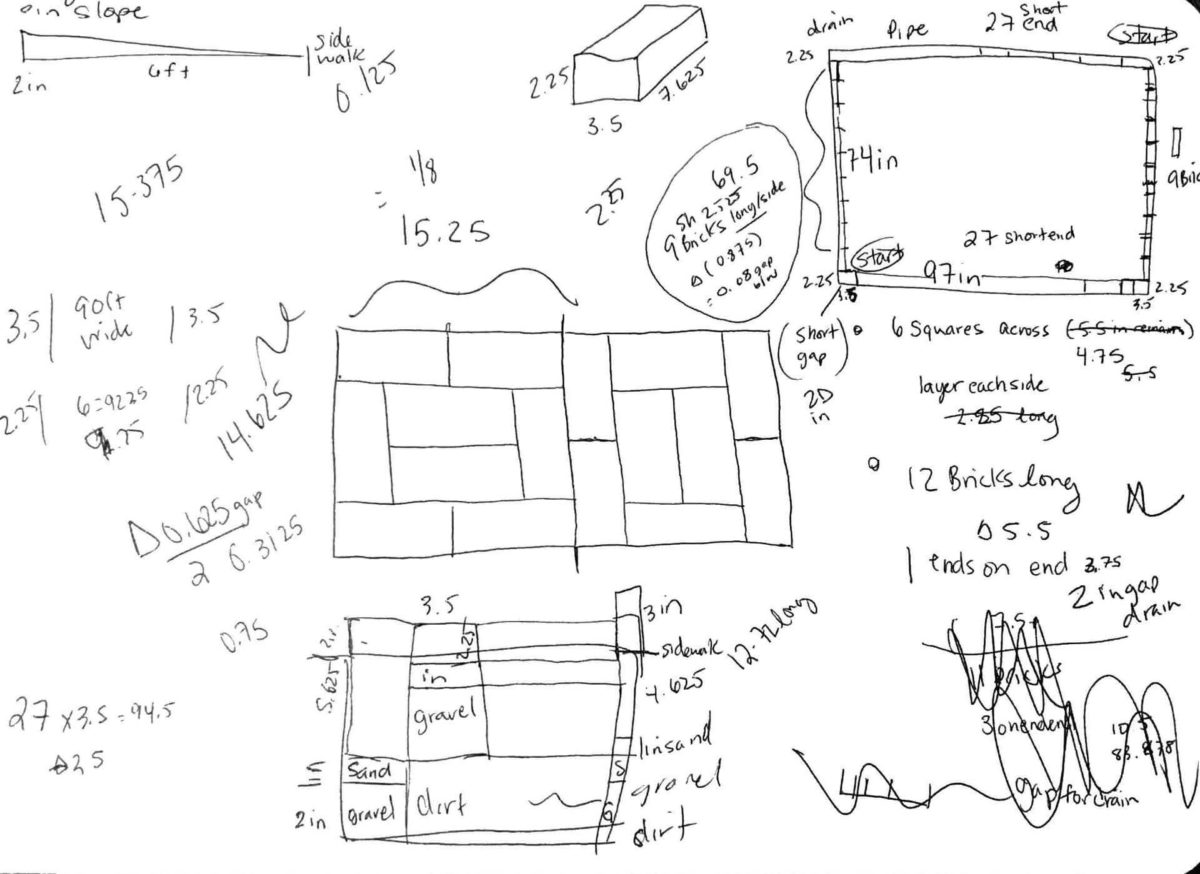
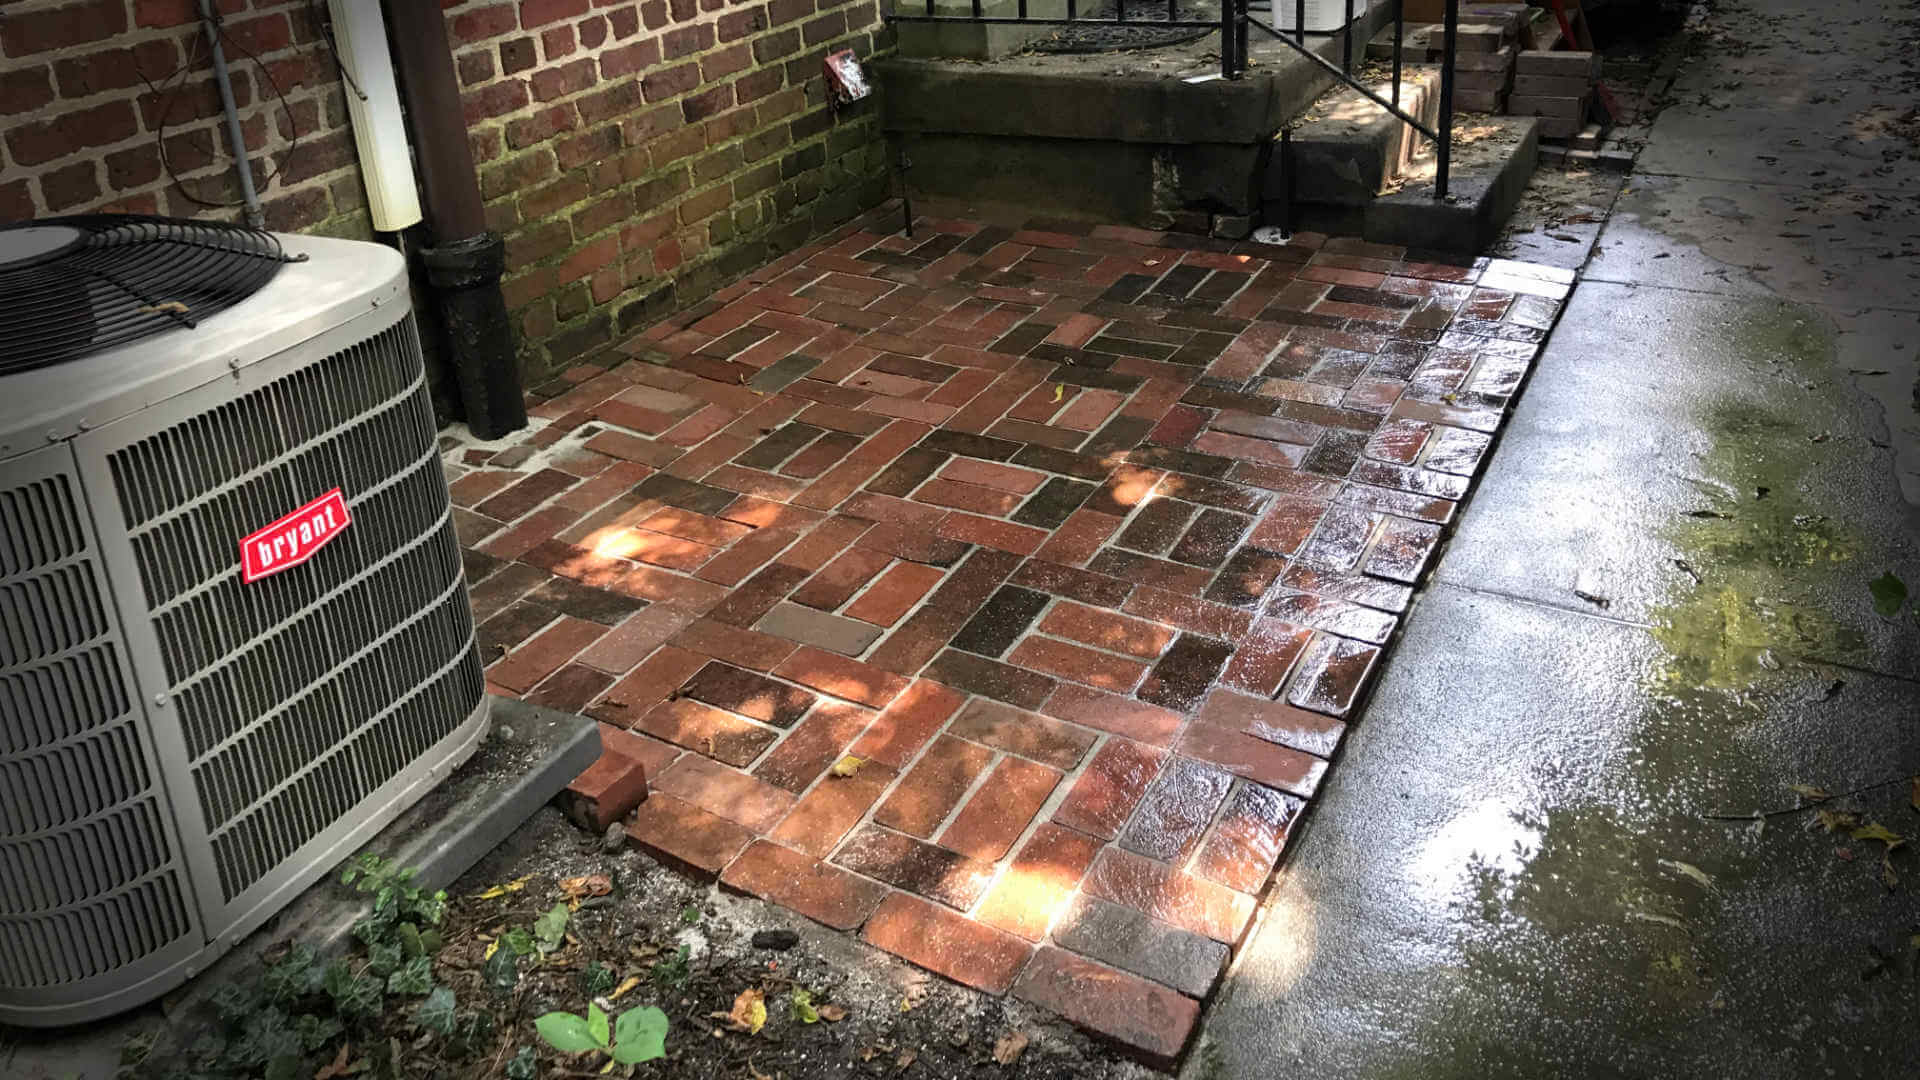
Let’s take a look at my most recent patio project as an example.
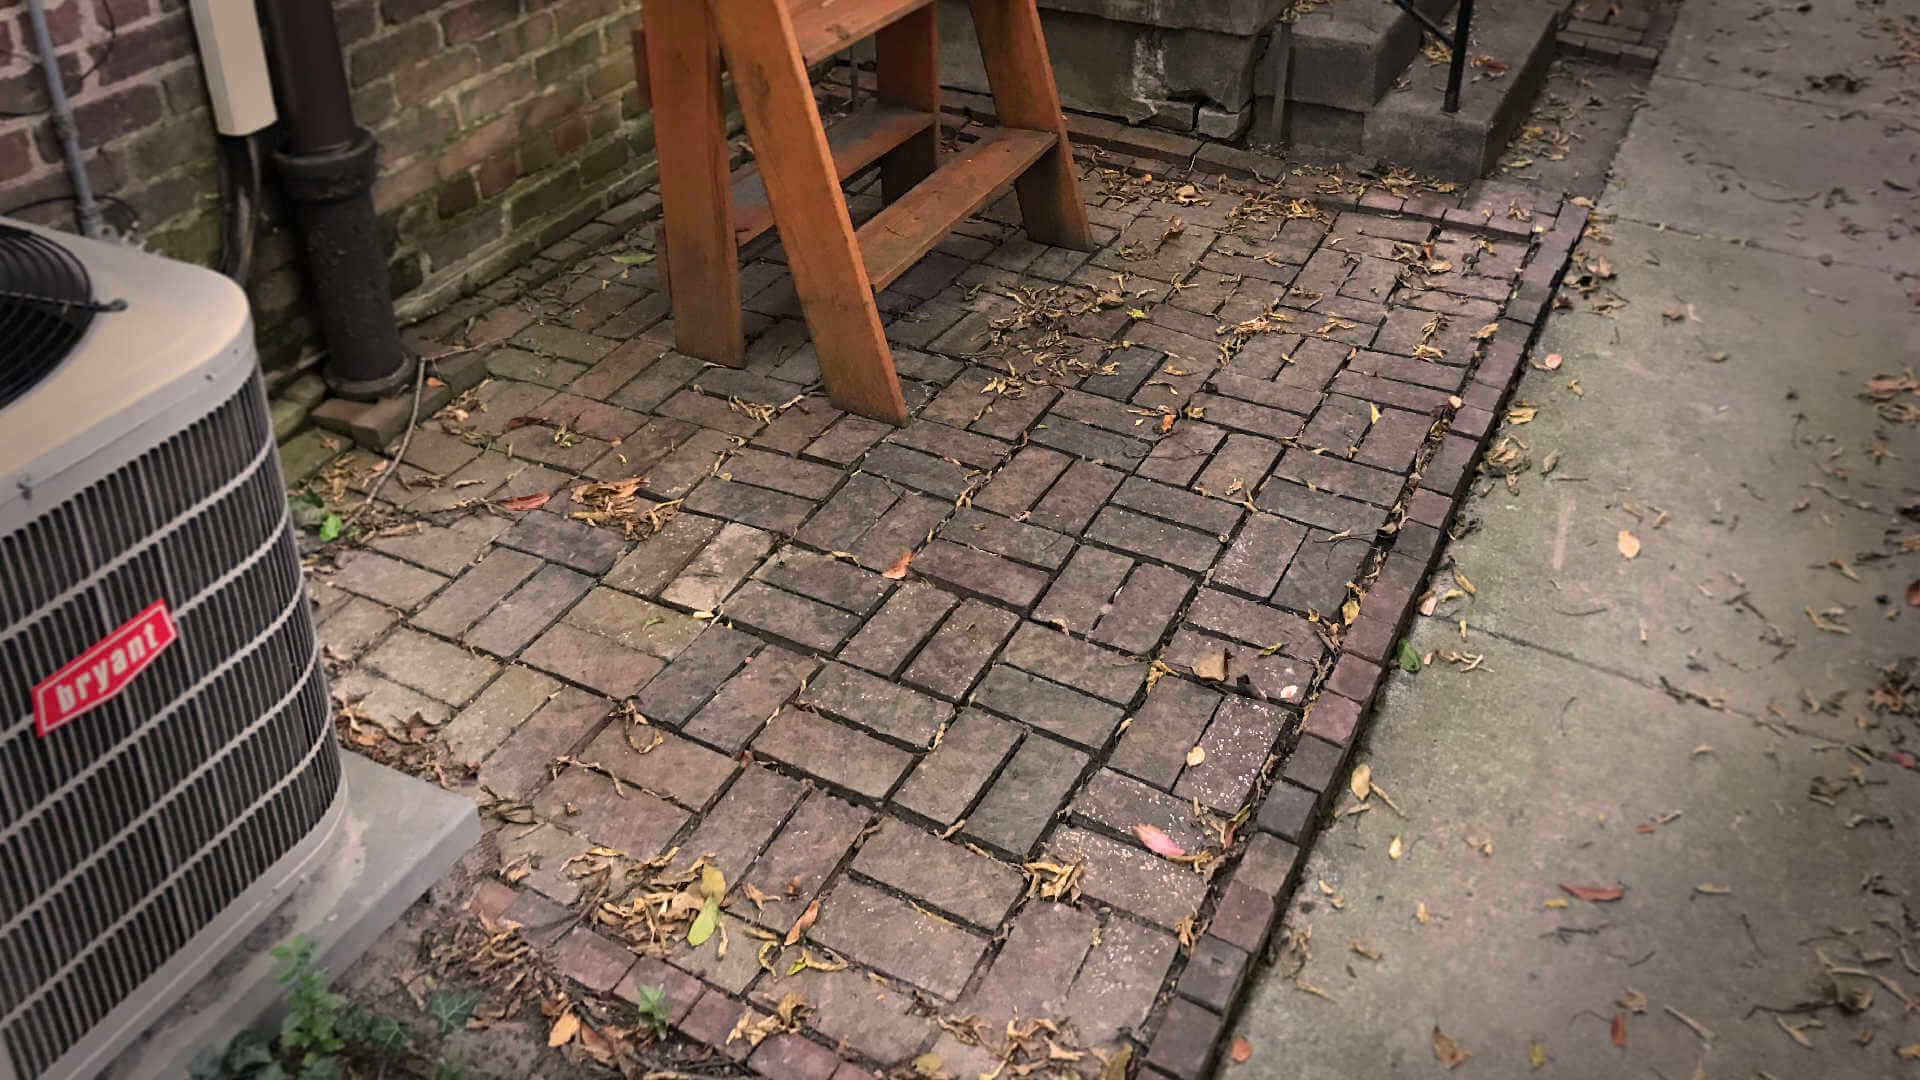
Seven years ago we purchased our home with a brick patio slightly sloping towards the house. Sunken bricks caused pools to form after it rained increasing the number of mosquitos that jumped at the sight of bare skin. We knew then it needed to be re-graded but didn’t think we could do it ourselves.
We were afraid of doing something wrong, messing it up and making the problem worse. But after getting a quote, the potential of saving money was a motivating factor to learn how to DIY.
Research: What am I getting myself into?
Figuring out exactly what the project entails can give you a better picture of the entire process and the detailed steps that are involved. Even if you think you know what you are doing or have done it in the past, it’s best to do a little research before getting started. You may learn something new or how to do it in a better way. This is where I started to be able to answer if I can and if I should DIY our brick patio.
For home repair projects, I enjoy watching a few episodes of “This Old House”. They’ve got a fantastic back catalog of episodes freely available on YouTube. Their website is also a great resource for free guides!
It’s entertaining and educational at the same time. They show you all the steps involved, point out common mistakes, and have the homeowners help with the project. Seeing everyday people capable of performing the same steps I will need to do calms some of my nerves.
If you feel this is a potential project for you, continue to watch a handful of episodes or other tutorials. It’s a good idea to see the project from multiple points of view to grasp all of the things that you might encounter on your own.
To build more confidence in what I needed to do for our patio repair, I followed up my binge-watching with binge reading articles explaining the step-by-step processes. I tend to stick with the more professional websites to ensure that I am not being led astray. These are most useful when they are written out like a recipe, listing the supplies and tools followed by the step-by-step instructions.
Check your toolbox of life: Do you have what it takes?
From your research, you may have discovered that your project will require a skill you may not have. The fear of developing that new skill on your own home can be scary. But if you have reached this point in your DIY research, you probably are willing to try it out.
Just like you researched your DIY project’s overview, research ways to practice the required skill in a another way. Start small with a less risky project. Depending on the skill level, you may want to take a workshop at your local home improvement store.
Phone a friend
Just because it’s called a Do-it-Yourself project, doesn’t mean you can’t call a friend or a professional. It’s okay if you need help for certain tasks.
The point is, don’t let the fear of the unknown stop you. Go outside your comfort zone, learn the new skill and just try. In fact, this is one of the many benefits of DIY, adding new tools to your toolbox of life.
Time constraints: Do you have the time?
After questioning if you have the needed skills, be sure to consider the time commitment. Time can be a deterrent to ever start on your DIY project.
Remember, projects never seem to take as long as listed in the tutorials. I always double the time commitment it says for completion and then some.
Other factors that can delay the wrap up of your project may include:
- Unpredicted weather
- Drying time
- Obtaining any additional supplies
My patio tutorial listed two to three days to complete. I planned for a week. What I did not plan for was my neighbor to be gutting his kitchen at the same time. Our shared ally was full of workers coming in and out. Even though this pushed my timeline back a day or two, I was able to finish within my planned week.
Can you start yet?
At this point in your DIY preparation process, you should be getting more confident in your abilities to complete all of the steps that you will need to perform. Make a list of all the tools and supplies you need.
The next steps are to analyze the risks the benefits of DIY.
2) Risk Analysis
From small low-risk handmade gifts to much larger high-risk home and car repairs, all DIY projects have some associated risks. Not acknowledging these risks often holds people back from starting DIY projects.
Making mistakes can be costly or take up too much time. Messing up can mean you run out of supplies and have to purchase more. You may end up with a bigger project than when you started. You may get hurt, do something wrong, or exceed your abilities which will require a professional to fix.
Acknowledging the possibility of DIY mistakes
When you are considering a DIY project, you need to know your limitations. Taking the time to research and prepare will let you make the best decision on whether it’s worth the risk.
Sometimes making a mistake or not following the instructions to a ‘T’ can be beneficial. I often learn from my mistakes and it gives me the opportunity to personalize my DIY project. Just don’t go off-script when it comes to anything electrical, structural, or water-related.
However, if you don’t feel confident in your skills and there is a lot of risks, maybe you should leave this one to the professionals.
After my research, I knew what I was getting into. Knowing there was not much I could mess up on our patio eased most of my fears. If a spot ended up being too low, I could just add more sand to raise it up. If the whole patio wasn’t graded correctly, I would be no worse off than when I started.
3) Benefits of the DIY Experience
To DIY the right way with proper research and planning takes a lot of time and energy. There is still a risk of making a mistake. Why does anyone DIY when it can just be paid for? It’s pretty easy to argue that my value of time would suggest I should pay someone else to do this DIY project.
Given this is a financial independence blog, you may think the answer is always to save money. Although money is a factor, it’s not always the first thing that comes to mind.
Learning how to do something beyond your current skill set can be enjoyable and doubles as a long term investment in yourself. My creative gene loves the thrill of a creative challenge. I am the one that will jump on putting new furniture together following the wordless pictogram sent as instructions. The challenge is to figure out how it goes together but in the end, I get to see the fruits of my labors.
Completing a DIY project feels rewarding and is an investment in yourself. With every new DIY project, you can improve the skills you have learned and continue to remove the fear of making mistakes.
Not all DIY projects are successful. That is why it is important to prepare and properly evaluate the risk before starting. Not all projects should be done by an amateur. While I don’t think I could turn my DIY hobby into business anytime soon, that doesn’t mean it hasn’t been valuable in non-monetary ways. Sometimes DIY projects will benefit you by saving money, being entertaining, or let you develop a new skill. All will come with time investment and some form of risk.
When the Benefits Outweigh the Risks
We determined the risk of our DIY brick patio project was low. The benefits were high on both a financial and skill-building level.
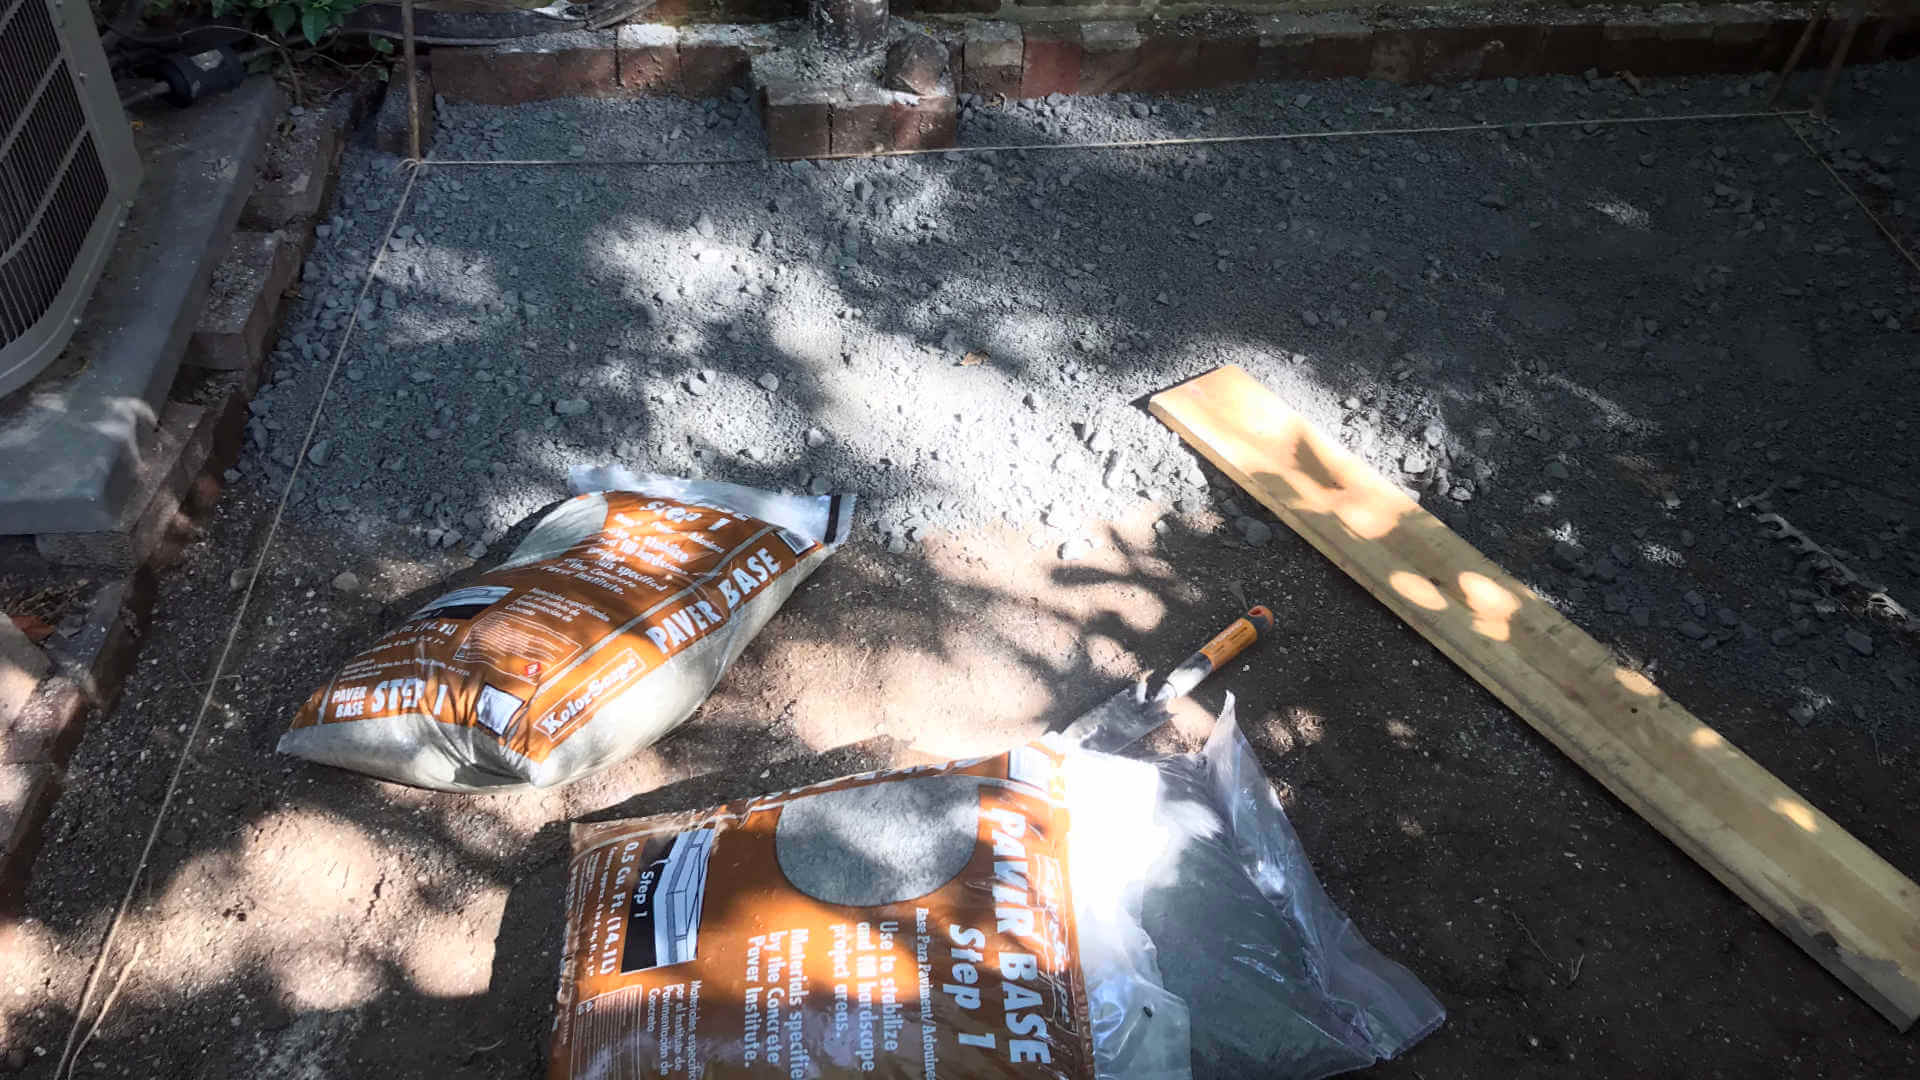
I could simply remove the back row of old bricks, throw some dirt or rocks down to lift them up, then relay them. Instead, I decided to buy fresh, proper materials to gravel pack and sand support the entire brick patio as if it was new. I wanted to be frugal rather than cheap with this project. The supply cost was less than $100. I was able to borrow most of the tools to bring the cost down even further.
I learned the steps to do it correctly. Once I had a few days free, I checked the weather, slathered on the bug spray, and got to work.
Learn From DIY Mistakes
In the process of all my DIY projects, I gained new skills but made some mistakes. None of these mistakes were a deal breaker or were unexpected. I knew the risks before I started because of my research.
Our patio needed to be elevated on the back half to create a decline away from the house. I thought I wouldn’t need as many bags of sand as I calculated but I ended up needing more sand than I bought. The rain caught me off guard. Properly grading was also harder than I thought. I did follow the instructions but I must have cut some corners and paid for it with a few uneven spots that I would have to fix in the end.
A quick trip back to the store and a few more hours hunched over the patio was all it took to make it right.
Making mistakes and having the opportunity to learn from your mistakes is one of the benefits of DIY. The things I remember the most are from the mistakes I have made. Remember these tips to avoid mistakes in the future.
- Always research even if you are familiar with the topic
- Check the weather
- Have extra supplies to finish your project, return unused supplies
- Prepare for the worst-case scenario just in case
Even with minor mistakes, we saved money and I am happy with the outcome of our patio. Now, I am proud to say that I re-designed and re-graded our brick patio all on my own. I recently replaced my combo meter dashboard display in my Prius, too!
If you are afraid of DIY because you are afraid of making mistakes, just start small. Never jump into a highly skilled project without working up to it. Do your research and know your limitations. You may find out that it’s better to not DIY but you will never know unless you try.
With each skill you develop, you gain a little more freedom in your life and you reduce dependency on others. Every time I conquer my fears of DIY, new skills lend a little more personal fulfillment as I feel like a more capable, adept, and skillful person.
Post-script followup on DIY mistakes:
As I write this post, I just finished up another small house project. And I have to admit, I made another mistake!
Replacing the screen on our front door was a simple DIY, but I made the poor assumption that we had some extra paint. I wanted to touch up a few spots and much to my surprise, the can was mostly dried up. Not wanting to leave the front door spotted with white primer, I had to do some quick thinking. Fortunately, I was able to get enough liquid paint to finish the job and call it a day. Next time, I will heed to my own advice and check all my supplies before starting.
What kind of DIY fears have you had? Got any DIY mistakes to share? Let us know in the comments!
4 replies on “3 Steps to Conquer Your Fears of DIY Mistakes (And More!)”
I like this post a lot!
20 years ago, I was terrified of DIY. Yesterday, I installed a new subpanel in my basement, a task that could have killed me if I messed it up.
“With each skill you develop, you gain a little more freedom in your life and you reduce dependency on others. Every time I conquer my fears of DIY, new skills lend a little more personal fulfillment as I feel like a more capable, adept, and skillful person.”
Yes! It’s a positive feedback loop! One small success leads to another. Learning how to set tile will give way to building your own home if you give it enough time!
Thank you so much. I feel like after writing that post I am finding more and more things I want to do. I might just have more time or my confidence is growing.
It’s nice to be able to do things for yourself and develop a process to learn and grow from each experience.
I’m actually reading your post right now on Money Withdrawal Strategies to learn more for myself about how our plan is going to work. Thanks again!
This is so awesome! I always had some sort of “fear” of big household DIY projects. Things like landscaping, simple tiling and just plain building stuff. Even basic maintenance was something I struggled with. I’m definitely planning on fighting this fear once I go back to being a home owner.
I’ll hit you guys up for some advice 🙂
It’s intimidating! The process to do anything is pretty opaque and there’s gatekeepers all along the way, not to mention fear of injury.
But like with FI, it’s one little step at a time until you’ve built up the skills to take on a full project. You don’t just go in whole hog replacing the electrical system, tearing down a supporting wall, and rerouting plumbing.
And make sure you ask her, not me! 😉